I am going to be doing a tabletop review of Magpul Flashlight Mount, I am also going to install it and test fit some flashlights. This item is what Magpul calls their V block and rings. It is designed to work in conjunction with a Picatinny rail mount that they also sell that is sold separately so to complete a solution like this. You need to purchase this kit and then, of course, a Picatinny rail section, and what this gives you is the ability to take a standard flashlight and mount it to a firearm. Now the Rings on this are adjustable, so it will handle a light body from 0.75 of an inch to 1.04 of an inch. Now that’s kind of a key feature because a lot of flashlights out there say, oh, these are 1-inch flashlights, but they do not necessarily say what part of the flashlight is one inch. So, you may end up having to mount your flashlight via the tail cap, whereas you may want to mount the flashlight further up on the body of the flashlight and that is not possible.
So, a lot of mounting solutions out there they are either like 0.75 or they are 1-inch there that is just it. If your flashlight does not fit that specific diameter, then you are going to have an issue. This is nice because it can accommodate different sizes. So, we are going to look at that and see if what Magpul claims is a hundred percent accurate. This is the first one of these that I have had a chance to look at, so I am going to be opening it and discussing it. For the first time as well now, this has a retail of about 17 dollars.
Contents
Magpul Light Mount Kit
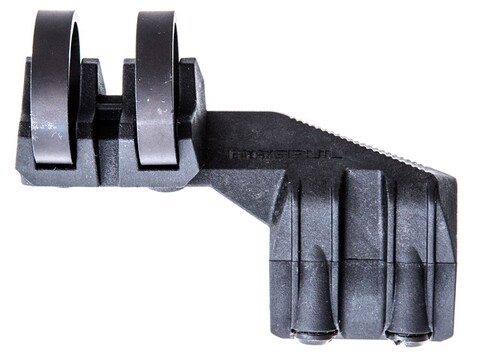
It is made from a reinforced polymer the standard, Magpul polymer materials and milspec anodized aluminum. I believe they primarily design it to mount to their mos scalp mount or their M lock. Cantilever rail mount and I happen to have a M lock, cantilever rail mount here which we will be looking at and we will be mounting it to this in just a little bit. So, let me go ahead and take this out of the packaging and we will look at the contents. Okay, here is the contents of the package and inside the package also are some instructions for assembling and mounting the V block and M lock accessory installation instructions, and this is specific for mounting a block type of rails onto hand guards. So, this does not necessarily apply to assembling. The brown cardboard material also folds out, and there are instructions inside as well. The first thing I noticed is okay, so this is a complete kit. This is what you get, and you get the wrench, and you would think the wrench is for the bolts. Well, it is not, and it says right in the instructions to tighten these bolts down with a 3/32 Allen wrench and it is not included.
So, I find this quite odd that Magpul is including a wrench that in a kit you know this kit and this wrench does not work with kit. Now what does this wrench fit? Well, I do not exactly know what Magpul intentions were by including a tool. It does not work with the bolts included in this kit, but I did notice that if I take the cantilever mount here, this M lock cantilever mount. The wrench does fit those bolts so and this is sold separately. This is not part of the kit. This is something you buy separate, so they include a wrench to work with something that does not come with a kit.
Okay, so now that we are past that, the mounting piece – is the polymer part of the kit. Of course, we have the button head, hex bolts, with a little bit of thread, Locker on them, which is nice, and then we have the Rings, which are a lightweight aluminum type material. They are for the most part round, although on the inside near the top they are flat and like so, and these are intended to go inside of these recesses, and you can see how it trude’s through the back. You would take your cantilever Magpul mount sold separately, and you can see the cantilever mount. You can use this with standard Picatinny rail components, but you also notice that there’s holes here. There is a little square cutout and that is specific to work with this type of component.
Magpul M Lok Flashlight Mount
So, this is how you would mount this component and then you would take these screws and you would put them through the bottom and screw them into this ring. The adjustability of this ring is done by how tight you tighten the bolt down. So, if the bolts really loose the ring will be out here. If you tighten it down low, it gets small. So, there is a certain level of adjustability. That is that’s! What allows you to mount a flashlight from 0.75 to 1.04? It is this type of design right here and what we are going to do is I have got a couple of flashlights. I have a stream light; poly tack and I have a Blackhawk x6p flashlight and I did have my caliper out. I was going to measure the diameters of these, but my battery’s dead in my caliper. So, these are right around. I think the poly TAC here is right around 0.75 or 0.8 or something that is a little bit smaller than one inch. The blackhawk, I think it is right around one inch to the blackhawks, a little thicker.
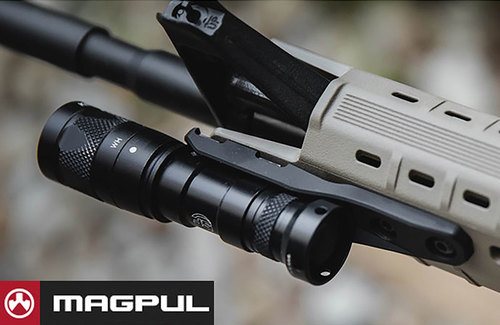
That is why I have these two out here, because I know the bodies of these are different sized with a one-inch mount with a Polytech. I must mount the one-inch mount to that to the cap here. I cannot mount it to the body because the body is not 1 inch, but on the Blackhawk, I can mount it to the body. So, what we are going to do is we are going to experiment now that we have looked at this and I have talked about a little bit, we are going to experiment with a couple of these flashlights, and we are going to mount them to this and put it on the cantilever Mount so the first thing we are going to do we are going to take off the cap of the Blackhawk xxp we’re going to slide
These rings on these rings slide on here, easy, and so go ahead and slide those on and then the next part is. You basically are going to have to get the Rings lined up with the openings and then, of course, you have got to put your cantilever rail mount on there and then you have got to get the screws through and get them started in the Rings. So, what I am going to do is since Magpul did not include an Allen wrench, I have got to scrounge one up real, quick. With 332nd Allen Key we basically put these bolts through the cantilever mount through the ring mount base, and we just must get the ring holes aligned up with the bolt and get it started. And of course, you want to make sure you do not cross thread and tighten them down and you can see on this one-inch bodied Blackhawk x6p. It fits fine, so I can adjust the flashlight mounting point pretty much anywhere on the body. So, it works as advertised.
It mounts the flashlight very tight, so it is not going to move around on you. Now the thing that I am looking at right now I am looking at the access for these bolts. These are the lock bolts that go on to the handrail, and I am thinking now that this wrench that they include with this v block kit, is starting to make sense now, because a standard Allen, the key you are, going to have difficulties getting in here. Once you mount the flashlight this specialized tool that they include with it will get in there and allow you to get to the lock bolts, you can see that I got plenty of clearance in there, so I guess I figured out why they included this. So, this is good. This is a good tool that you are going to need for getting access to your M lock bolts. It is just too bad that they did not include a 3/32 regular Allen key for doing these, which would have been nice. Mounting this assembly to the x6p went without issue nice tight, fit on this flashlight.
Best light mount for Magpul MOE handguard
Next up, I am going to swap over to the poly tack, which has a smaller body and see how well this fit to the poly tack. Alright, I have the Rings on the poly tack. You can see that there is a lot more play in these rings because of the body of the poly tack is a little bit smaller than the body of the Blackhawk. I will try to get the bottom parts kind of lined up and getting that in place, and we must get these bolts started and you can kind of look down through here and you kind of see where the rings are in reference to the bolt to help you get it started not complicated. Then it is just a matter of tightening these down and snugging up this polymer body to the flashlight. Take out the slack in the Rings and there we go.
We have a nice solid mounting for the streamlined poly TAC flashlight nice and solid works out very well. So two different sized bodied flashlights, this ring assembly accommodates, and both holds them very solid works out Real good. Since we have mounted two flashlight samples, I have confirmed that it works great I do not see anything else to be concerned about let us go ahead and put this on my rifle and we will look at how this looks mounted on a rifle. Okay?
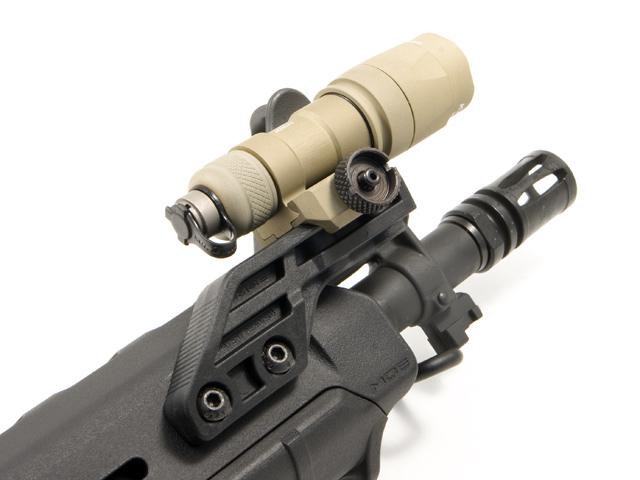
I have my SBR out here that has a Magpul SL handguard on it, so it is an M lock, compatible handguard and I have got this flashlight and mount assembled. These 332nd screws that mount the flashlight to the cantilever mount. I should mention that the instructions state that the maximum torque is between ten- and fifteen-inch pounds. So, you do not want to make these too tight. So, there are some torque specifications for that. To get this M lock mounted to this handguard, you can see that these tabs are already on here with modified bolts. These bolts have been shaved down, so they do not hit the heat shield. We basically just align these up and, of course, it has already had Loctite on. We just align these up and we are going to use the shortened Allen wrench that comes with this kit, which I am, and we just turned this until the nut locks into place on the handguard. Excuse me, while I fumble around with this last one, because I am looking at the camera instead of looking at what I am trying to do, okay and that tightens into place as well there is the flashlight mounted um on this rifle.
Magpul Flashlight Mount Picatinny Rail
I have it mounted on the right side, so it does not interfere with my left hand as I hold this. It is not the most convenient place to put it, but you know for the purposes of this demonstration you can get the idea of what this looks like. So, you can mount your flashlight with this and lock. You could mount it to the bottom. If you wanted to have it on the bottom, you can mount it on the left or the right. The only place you really cannot put it is on the top because there are no M lock slots on the top anyway, that is going to pretty much wrap up this tabletop review of the Magpul V block and rings tabletop review as well as installation. I give this product two thumbs up.
I normally do that with most Magpul products because there they are just excellent products. The inclusion of this modified wrench for installing your cantilever mount after the flashlight is installed exceptionally good idea at first. I was not exactly sure why this was included, but now I do know why – and I appreciate Magpul for the thought. I wish they would include a 3/32 wrench to do the bolts for the actual rings. That is kind of a bummer that they did not include.
This Flashlight Mount from Magpul Industries fits on any standard 1913 Picatinny Rail, is available in right or left side models, and integrates with the Magpul XTM …